Here are some programs and online resources for our members that are working remotely and seeking information. This page will be updated from time to time by needs and requests. Please send questions or comments to Kang Chen via email or by using Microsoft Teams. If you need remote assistant, please contact Kang. You can use Teamviewer to share your screen or remote control your system to troubleshoot; download the quick support file and run it. Let Kang know the ID number and password for him to connect to your machine.
(Latest update 03/01/2022 by Kang Chen)
Columbia University Irving Medical Center VPN (Virtual Private Network) – There are many resources such as website, servers, shared folders, and other applications are host internally only for CUIMC internal network. You will require to first log into the CUIMC network by using VPN. Without VPN, you will not able to access these resources remotely.
Access to VPN is granted to CUIMC full-time students, faculty, and staffs by default. For those who does not have access, should contact their PI and DA for more information. An instruction page from CUIMC can be find in this URL: https://cumcprod.service-now.com/kb?id=kb_article_view&sys_kb_id=edd5e6c61b4b2f009b698622dd4bcb40. Follow section III – Set Up AnyConnect VPN and select your OS to set it up.
You will require do have DUO MOBILE installed in your smartphone before getting able to login CUIMC network using VPN.
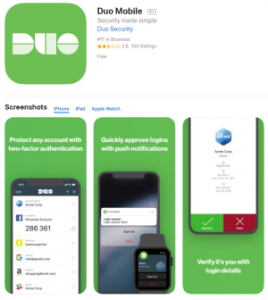
Please use the URL with instruction of how to install and setup DUO MOBILE for CUIMC. https://mfa.cumc.columbia.edu/content/how-enroll-cuimc-mfa
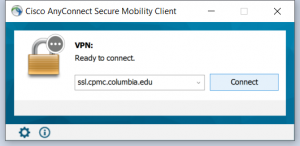
When running Cisco AnyConnect VPN make sure you see ssl.cpmc.columbia.edu in the column before clicking Connect like below:
I have created this video to show step-by-step how to use CUIMC VPN below:
NOTE: VPN for Columbia University is different from VPN for CUIMC. Make sure you install the correct VPN.
Columbia University Software Download – Columbia University provide several license for different software that for members to use. Here are some of them that I find most people always looking for. Please see the list below and follow the instruction inside the link.
- Microsoft Office for Windows
- Microsoft Office for MacOS
- Malwarebytes – a virus, malware, and spyware scanning program. CUIT has purchased Malwarebytes licenses as the central endpoint solution for affiliated Columbia University students, Columbia faculty and staff.
- Symantec End-Point – Symantec End-Point no longer available from CUIT. It is replaced by Malwarebytes as the preferred anti-virus/malware application. Please contact me if there is special needs for it.
Other programs may need to submit request to purchase through Columbia University Volume Licensing. You can contact me or your P.I. for information.
Microsoft Office 365 – Microsoft has BAA (Business Associate Agreement) with CUIMC. I suggest you to use applications from it for works for better security. However, all activities and sharing resources can only between members who has their name@cumc.columbia.edu accounts due to CUIMC policy. Anyone who does not have CUIMC account will not able to access the CUIMC group.
There are several applications that offers by Office365 online. You can use your browser (Safari, Chrome, Firefox, Microsoft Edge) visit web address http://office365.com and login with your CUIMC email address and password.
- Microsoft OneDrive – (Please use this one instead of Dropbox or Google Drive when possible)
- CUIMC provide 1TB storage space for OneDrive space.
- You can share folder(s) and file(s) on your OneDrive to any other CUIMC members.
- This is HIPAA compliant.
- More Information about Microsoft OneDrive can be find at this CUIMC page here: https://cumcprod.service-now.com/kb?id=kb_article_view&sys_kb_id=f8453c981b47e7009ff2bbfccd4bcb6b
- Microsoft Outlook
- CUIMC has its own email different from Columbia University Morningside. All of our members should be using Microsoft Outlook instead of Google LionMail.
- Information about how to setup can be found here: https://cumcprod.service-now.com/kb?id=kb_article_view&sys_kb_id=b0161e261b76a3009ff2bbfccd4bcb0b
- Microsoft Teams –
- Very helpful communication program. Great for conference calls, from one-on-one to a team of 12 all will be good. It’s functions includes file share, history review, and many other shared office application functions that implemented in it.
- You can see the tutorial video: https://www.youtube.com/watch?v=CH2seLS5Wb0
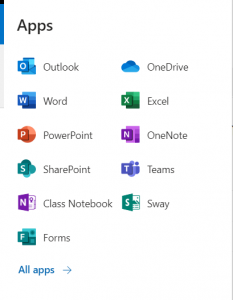
- Login – There are two ways of using Microsoft Teams.
- Online – Log into Office365.com using your CUMC email and password. Click on the icon at the top-left corner. You should see something like this below, if you don’t see Teams, click “All apps->” then you should see it.
- Using Teams program. Download Microsoft Teams at the URL: https://products.office.com/en-us/microsoft-teams/download-app
Once it is installed, login using CUMC email user ID: UNI@cumc.columbia.edu and the password for it.
ZOOM for Healthcare Video Conferencing
We are now live with Zoom for Healthcare. Zoom for Healthcare is a HIPAA, PIPEDA & PHIPA compliant video conferencing software with secure, real-time encrypted messaging and content sharing that can be used by faculty, researchers, administrators, students, and staff. This technology solution allows patients to be treated virtually from anywhere, from any device, ensuring timely medical care and can be used for telehealth visits, research study visits, classes, lectures, and meetings.
Here is the URL with more information:
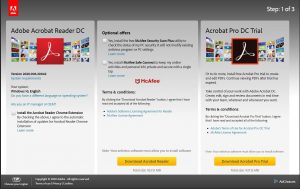
Digital ID Signature – Using Adobe Acrobat DC
Adobe Acrobat DC is a free to download program that you can download from Adobe.com. The download URL is below:
This can be use for READ/OPEN a PDF file as well as to create a digital signature to the PDF document.
Here are the steps of how to create a Self-Signed Digital ID: (To Sign a PDF document Electronic)
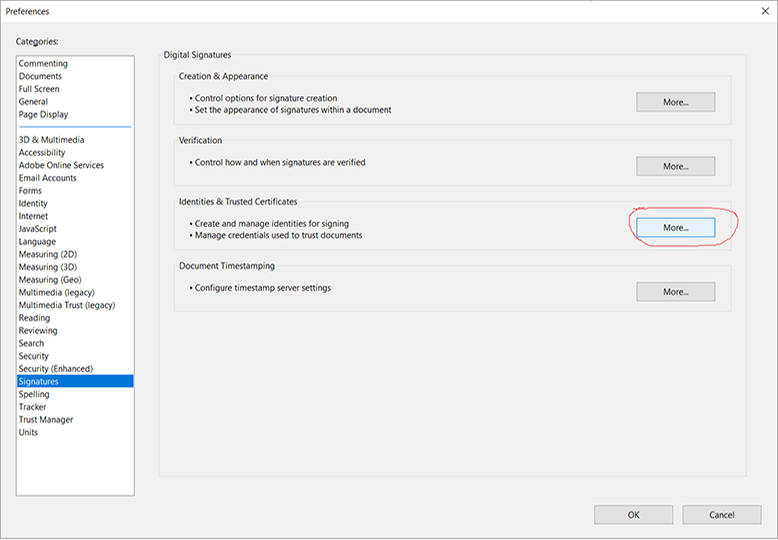
- In Acrobat, click the Edit menu and choose Preferences > Signatures.
- On the right, click More for Identities & Trusted Certificates.
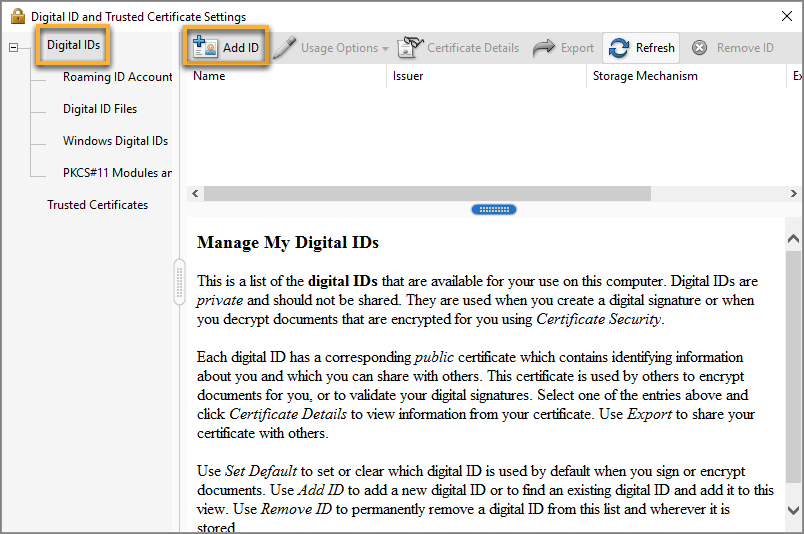
- Select Digital IDs on the left, and then click the Add ID button
 .
.
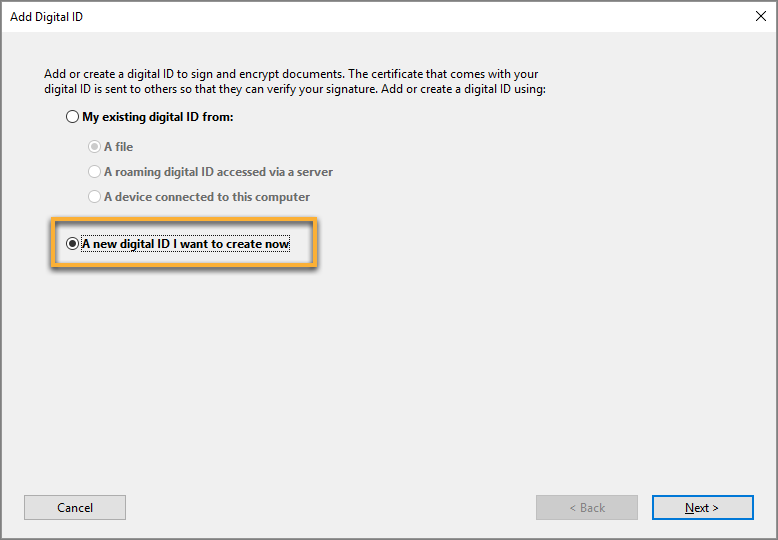
- Select the option A New Digital ID I Want To Create Now, and click Next.
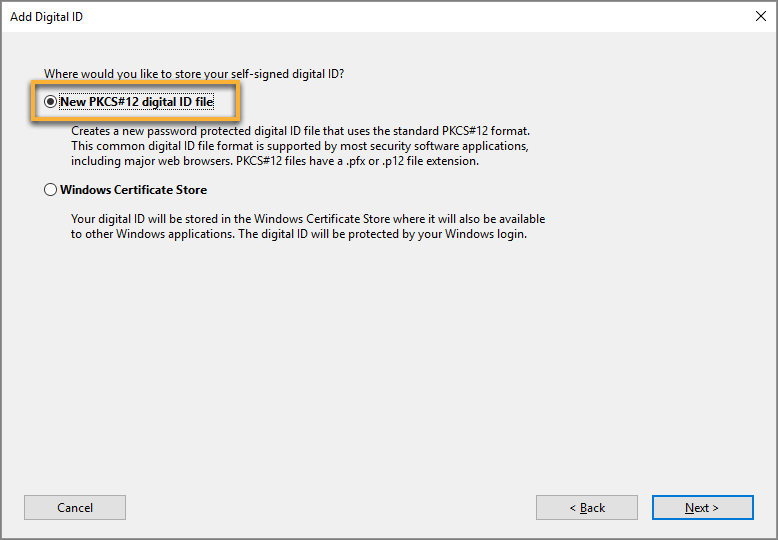
- Specify where to store the digital ID, in our case, we will use New PKCS#12 digital ID File
- Type a name and other organization information. Keep the default country, Key Algorithm, and Use digital ID as below.
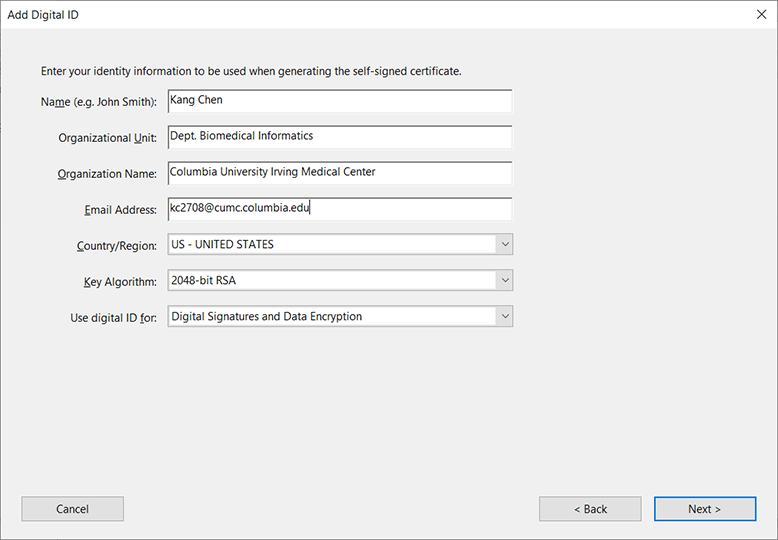
- Click Next when all filled in.
- Type a password for the digital ID file. For each keystroke, the password strength meter evaluates your password and indicates the password strength using color patterns. Reconfirm your password. The digital ID file is stored at the default location as shown in the File Name field. If you want to save it somewhere else, click Browse and choose the location.
- Click Finish.
Here are the steps of how to use Self-Signed Digital ID to sign a PDF document that has a signature column.
- Open the PDF document that you like to sign(or add your signature into it) using Acrobat Reader DC.
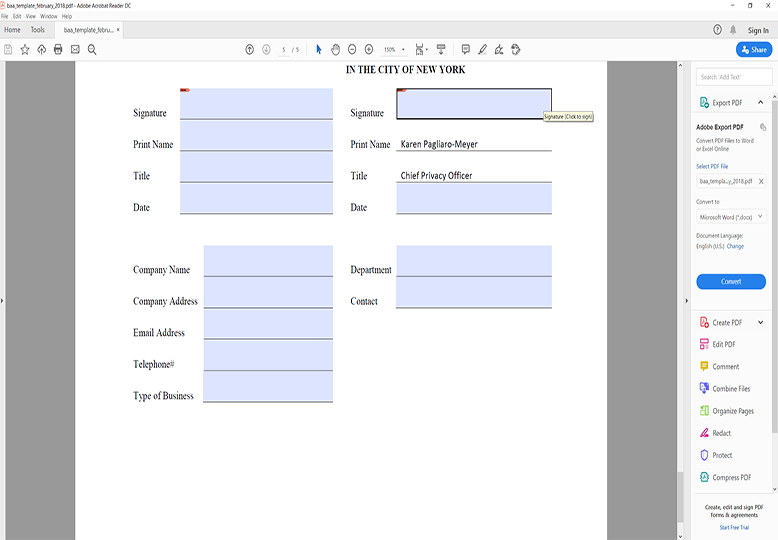
- There are two type of PDF forms. One is a form that ALREADY created signature column. Another one is a form WITHOUT a pre-exist signature column. Example I will be using is the Business Associate Agreement (BAA) between CUIMC and vendor which already have pre-exist signature column.
- Open the Document, scroll down page 5 at the signature location. Move the mouse cursor and you will see
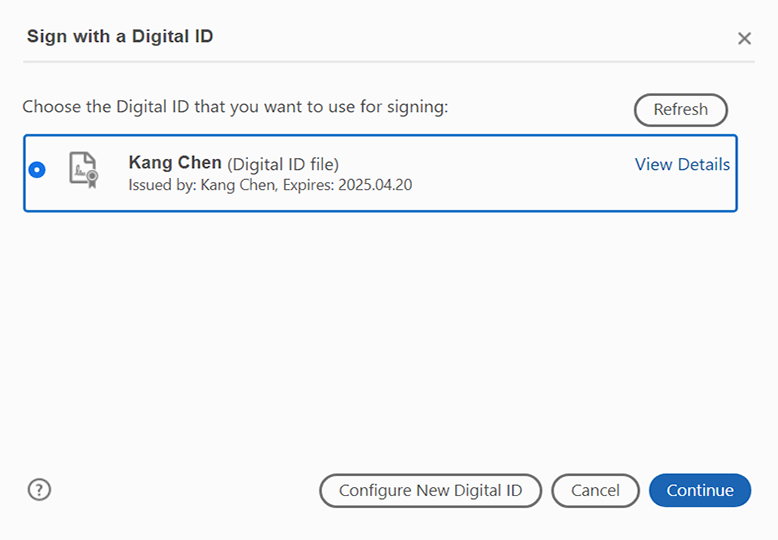
- A new windows will pop up showing the Digital ID that I created before. Click it and click Continue.
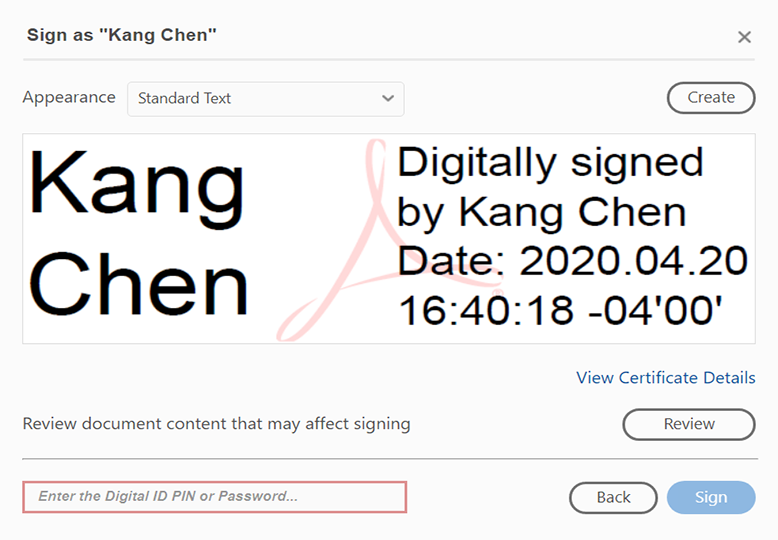
- Next windows will show the digital signature. Type in the password when creating the signature from before. Then click Sign
- A New Windows will pop up asking where you like to save the NEW PDF FILE. (With your digital Signature in) Choose the location you like to save as and the filename you like to put in. Click Save
- You are all DONE!
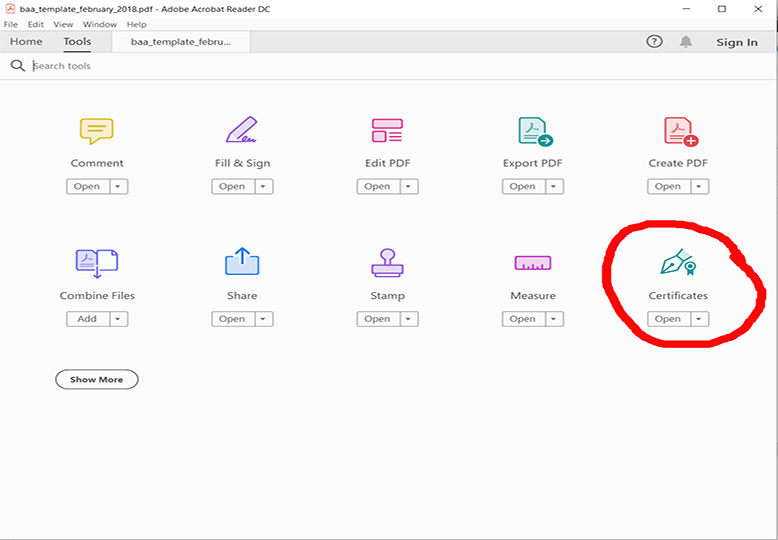
To add a Signature into a PDF document without signature column.
- After open the PDF file. Scroll to the location you like to add signature in.
- Click Tools on the top, select Certificates
- Click the Digitally Sign icon on the top.
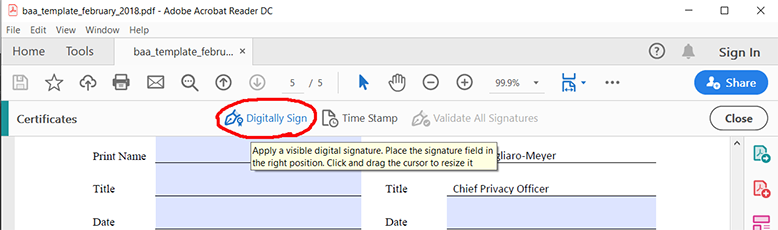
- Using the mouse, click and drag to draw the area as the instruction say.
- A New Windows will pop up, select the Digital ID that created before. Then click Continue.
- Next windows will show the digital signature. Type in the password when creating the signature from before. Then click Sign
- A New Windows will pop up asking where you like to save the NEW PDF FILE. (With your digital Signature in) Choose the location you like to save as and the filename you like to put in. Click Save
- You are all DONE!
To Access CUIMC DBMI IT Site, please use URL https://cumccolumbia.sharepoint.com/teams/DBMIIT.